

· Features of Apache Ant
·
Ant is the most complete Java build and deployment tool
available.
· Ant is platform neutral and can handle platform specific properties such as file separators.
· Ant can be used to perform platform specific tasks such as modifying the modified time of a file using 'touch' command.
· Ant scripts are written using plain XML. If you are already familiar with XML, you can learn Ant pretty quickly.
· Ant is good at automating complicated repetitive tasks.
· Ant comes with a big list of predefined tasks.
· Ant provides an interface to develop custom tasks.
· Ant can be easily invoked from the command line and it can integrate with free and commercial IDEs.
ANT Installation
·
Apache ANT – “Another Neat Tool” is a build tool provided by
Apache Foundation. The tool is used to compile java source code, package and
deploy. The tool can be downloaded from Apache ANT link. Once the ANT zip file
is downloaded, extract the zip to a folder. The path can be something link
C:\ANT. Once the contents are extracted we need to set classpath variables.
Follow the below steps carefully, to get this done.
·
Step 1. Prior to ANT installation, when you type ant in the
command prompt you will get message as shown in below picture.

Step 2. Get the folder locations for ANT and jdk. On
my machine I have below paths.
Apache Installation –> C:\apache-ant-1.8.4
jdk Installation –> C:\Program Files\Java\jdk1.7.0_02
Apache Installation –> C:\apache-ant-1.8.4
jdk Installation –> C:\Program Files\Java\jdk1.7.0_02
Step 3. Update the below text as per your above paths.
JAVA_HOME: C:\Program Files\Java\jdk1.7.0_02
ANT_HOME: C:\apache-ant-1.8.4
JAVA_HOME: C:\Program Files\Java\jdk1.7.0_02
ANT_HOME: C:\apache-ant-1.8.4
Step 4. Open your environment variables window (Right
click Computer > properties >Advance System Settings > Click
Environment Variable)
Step 5. Under SystemVariables click New; fill in the
details as shown in below picture and click OK.

Step 6. Under System Variables click New again and
create ANT_HOME providing correct variable value.
Step 7. Search for a variable named “PATH” under
System variables list. Select this variable and click Edit. Append the below
line to the existing content. Remove the first semicolon from the below text if
there is already a semicolon at the end of the opened text and click OK.
; %JAVA_HOME%\bin;%ANT_HOME%\bin;
; %JAVA_HOME%\bin;%ANT_HOME%\bin;
Step 8. Close the command prompt if previously open.
Open again ant type ant. Now you should be able to view the below message which
implies that the ANT is working properly.
Installing ANT for Windows 7
1. Download ANT http://ant.apache.org/
2. Unzip it and rename it to ant
3.Set environmental variables
JAVA_HOME to your Java environment, ANT_HOME to the directory you uncompressed, to do it on command prompt type this (Assume Ant is installed in E:\ant\.)
set ANT_HOME=E:\ant
set JAVA_HOME=D:\Program Files\Java\jdk1.6.0_03
set PATH=%PATH%;%ANT_HOME%\bin
In windows 7 you can go to Control Panel\All Control Panel Items\System or right click on Computer and then to “Advance system setting”
-Choose Advanced Tab
-Press Environtmen Variables Button
-In the System Variables, click New Button
Give the Variable Name:ANT_HOME
Give the Value: E:\ant
Give the Value: E:\ant
Click OK
Then,we’ll add new ANT_HOME path,
And Click again on New Button if you do not have ‘path’ Variable in there, if so select it and edit as
Give the Variable Name:path
Give the Value D:\Program Files\Java\jdk1.6.0_03\bin;%ANT_HOME%\bin
Click OK
4. Check wheter ANT works correctly or not.
In the command prompt, type:
In the command prompt, type:
ant -version
Selenium
– Use Ant to Generate HTML and XSLT Reports
Apache Ant is an open source build tool. A build tool can be used to compile the source code, creating the build artifacts such as JAR, WAR, and EAR files. Some of the other usage of ANT is to run unit tests, do the application deployment on containers such as JBoss, Tomcat, WebSphere, WebLogic, GlassFish, etc, and to run Automated Selenium Tests.
Ant is a powerful build tool and also is very much extensible. There are several open source Ant libraries available which need to be just downloaded, unzipped, and copied (JAR file) into the Ant’s “lib” folder. Once the library file is copied, then we can utilize the “Tasks” in the Ant’s build.xml file. Ant’s “contrib library, jsch library, etc” are the best examples for such libraries.
Install and configure ANT
1. Download ANT from Apache web site – ANT download link
2. Unzip the ant and copy to C:\Ant folder
3. Now we need to configure environment variables: ANT_HOME
4. Navigate to environment variables and click on new button.
5. Enter Variable name as ANT_HOME and Variable Value as C:\apache-ant-1.8.4.Then click on OK button

6. Now select the PATH and click on EDIT button
7. Now give the semicolon (;) at the end and add ANT path up to bin folder

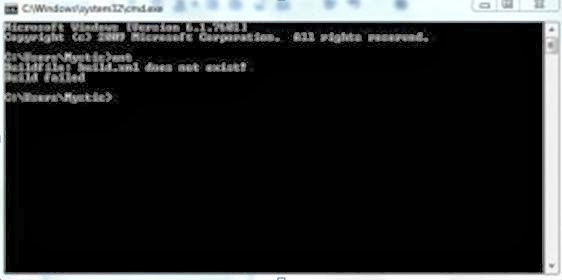
8. Now click on OK button and go to command prompt and type ANT.
“It will give message as build.xml not fount”
9. Now go to eclipse and add below build.xml file to your selenium project.

Build.xml file code
Apache Ant is an open source build tool. A build tool can be used to compile the source code, creating the build artifacts such as JAR, WAR, and EAR files. Some of the other usage of ANT is to run unit tests, do the application deployment on containers such as JBoss, Tomcat, WebSphere, WebLogic, GlassFish, etc, and to run Automated Selenium Tests.
Ant is a powerful build tool and also is very much extensible. There are several open source Ant libraries available which need to be just downloaded, unzipped, and copied (JAR file) into the Ant’s “lib” folder. Once the library file is copied, then we can utilize the “Tasks” in the Ant’s build.xml file. Ant’s “contrib library, jsch library, etc” are the best examples for such libraries.
Install and configure ANT
1. Download ANT from Apache web site – ANT download link
2. Unzip the ant and copy to C:\Ant folder
3. Now we need to configure environment variables: ANT_HOME
4. Navigate to environment variables and click on new button.
5. Enter Variable name as ANT_HOME and Variable Value as C:\apache-ant-1.8.4.Then click on OK button

6. Now select the PATH and click on EDIT button
7. Now give the semicolon (;) at the end and add ANT path up to bin folder

8. Now click on OK button and go to command prompt and type ANT.
“It will give message as build.xml not fount”
9. Now go to eclipse and add below build.xml file to your selenium project.

Build.xml file code


10.
In this Build.xml file give the path where you copied all the required jar
file.(Copy all the required jar files in any of the folder and mention that
path)
11.
Now go to command prompt and type > ant clean
It will clean all the required files related to ant.
12. Now type > ant compile
It will compile your code
13. Now type >ant run
It will clean all the required files related to ant.
12. Now type > ant compile
It will compile your code
13. Now type >ant run

It
will run your program and will generate HTML reports.
Generating selenium reports using TestNG-xslt through Ant
TestNG-xslt generates user friendly reports using the TestNG results output (testng-results.xml). Its uses the pure XSL for report generation and Saxon as an XSL2.0 implementation
For generating testng-xslt report for your project do the following:
1. Download the testng-xslt
2. Unzip and copy the testng-results.xsl from the testng-xslt folder(testng-xslt-1.1\src\main\resources) to your own project folder.
3. Now copy the saxon library from (testng-xslt-1.1\lib\saxon-8.7.jar)to where you created a folder for which you copied all the JAR files to run ANT.
4. Modify your build.xml of ant and add the following target to it.

5.
Now go to command prompt and follow below steps to generate XSLT reports.
6. Now type > ant clean
It will clean all the required files related to ant.
7. Now type > ant compile
It will compile your code
8. Now type >ant run
It will run your program.
9. Now type >ant xsltreports
It will generate xslt reports as below
6. Now type > ant clean
It will clean all the required files related to ant.
7. Now type > ant compile
It will compile your code
8. Now type >ant run
It will run your program.
9. Now type >ant xsltreports
It will generate xslt reports as below

Generate Interactive reports Using TestNG+ANT +XSLT In Selenium
XSLT stands for XML (Extensible Markup Language) Stylesheet Language for Transformations.
XSLT gives interactive(user friendly) reports with "Pie Chart"; but only on TestNG framework. It is better compared to ReportNG and ordinary TestNG reports. Its uses the pure XSL for report generation and Saxon as an XSL2.0 implementation.
XSLT = XSL Transformations
Steps to Generate testng-xslt report:
1. Download testmg-xslt.zip
2. Unzip and copy the testng-results.xsl from the testng-xslt folder(testng-xslt-1.1\src\main\resources) to your own project folder.
3. Now copy the saxon library from (testng-xslt-1.1\lib\saxon-8.7.jar)to your project lib folder.
4. Modify your build.xml of ant and add the following target to it.


0 Comments